Overview
Available in public preview
The Incident Management Application is a robust tool for tracking and resolving incidents in real-time. It streamlines incident workflows, enabling teams to manage tasks, update statuses, and maintain detailed activity logs with ease.
Incidents can be challenging, particularly during the critical initial stages of investigation and identification. FusionReactor's Incidents feature is packed with powerful, time-saving tools designed to help you respond swiftly and efficiently, minimizing downtime and streamlining your resolution process.
The application provides:
- Real-time incident tracking and resolution.
- Task assignment and progress monitoring.
- Comprehensive activity logs for auditing actions.
- Tools for efficient collaboration and communication.
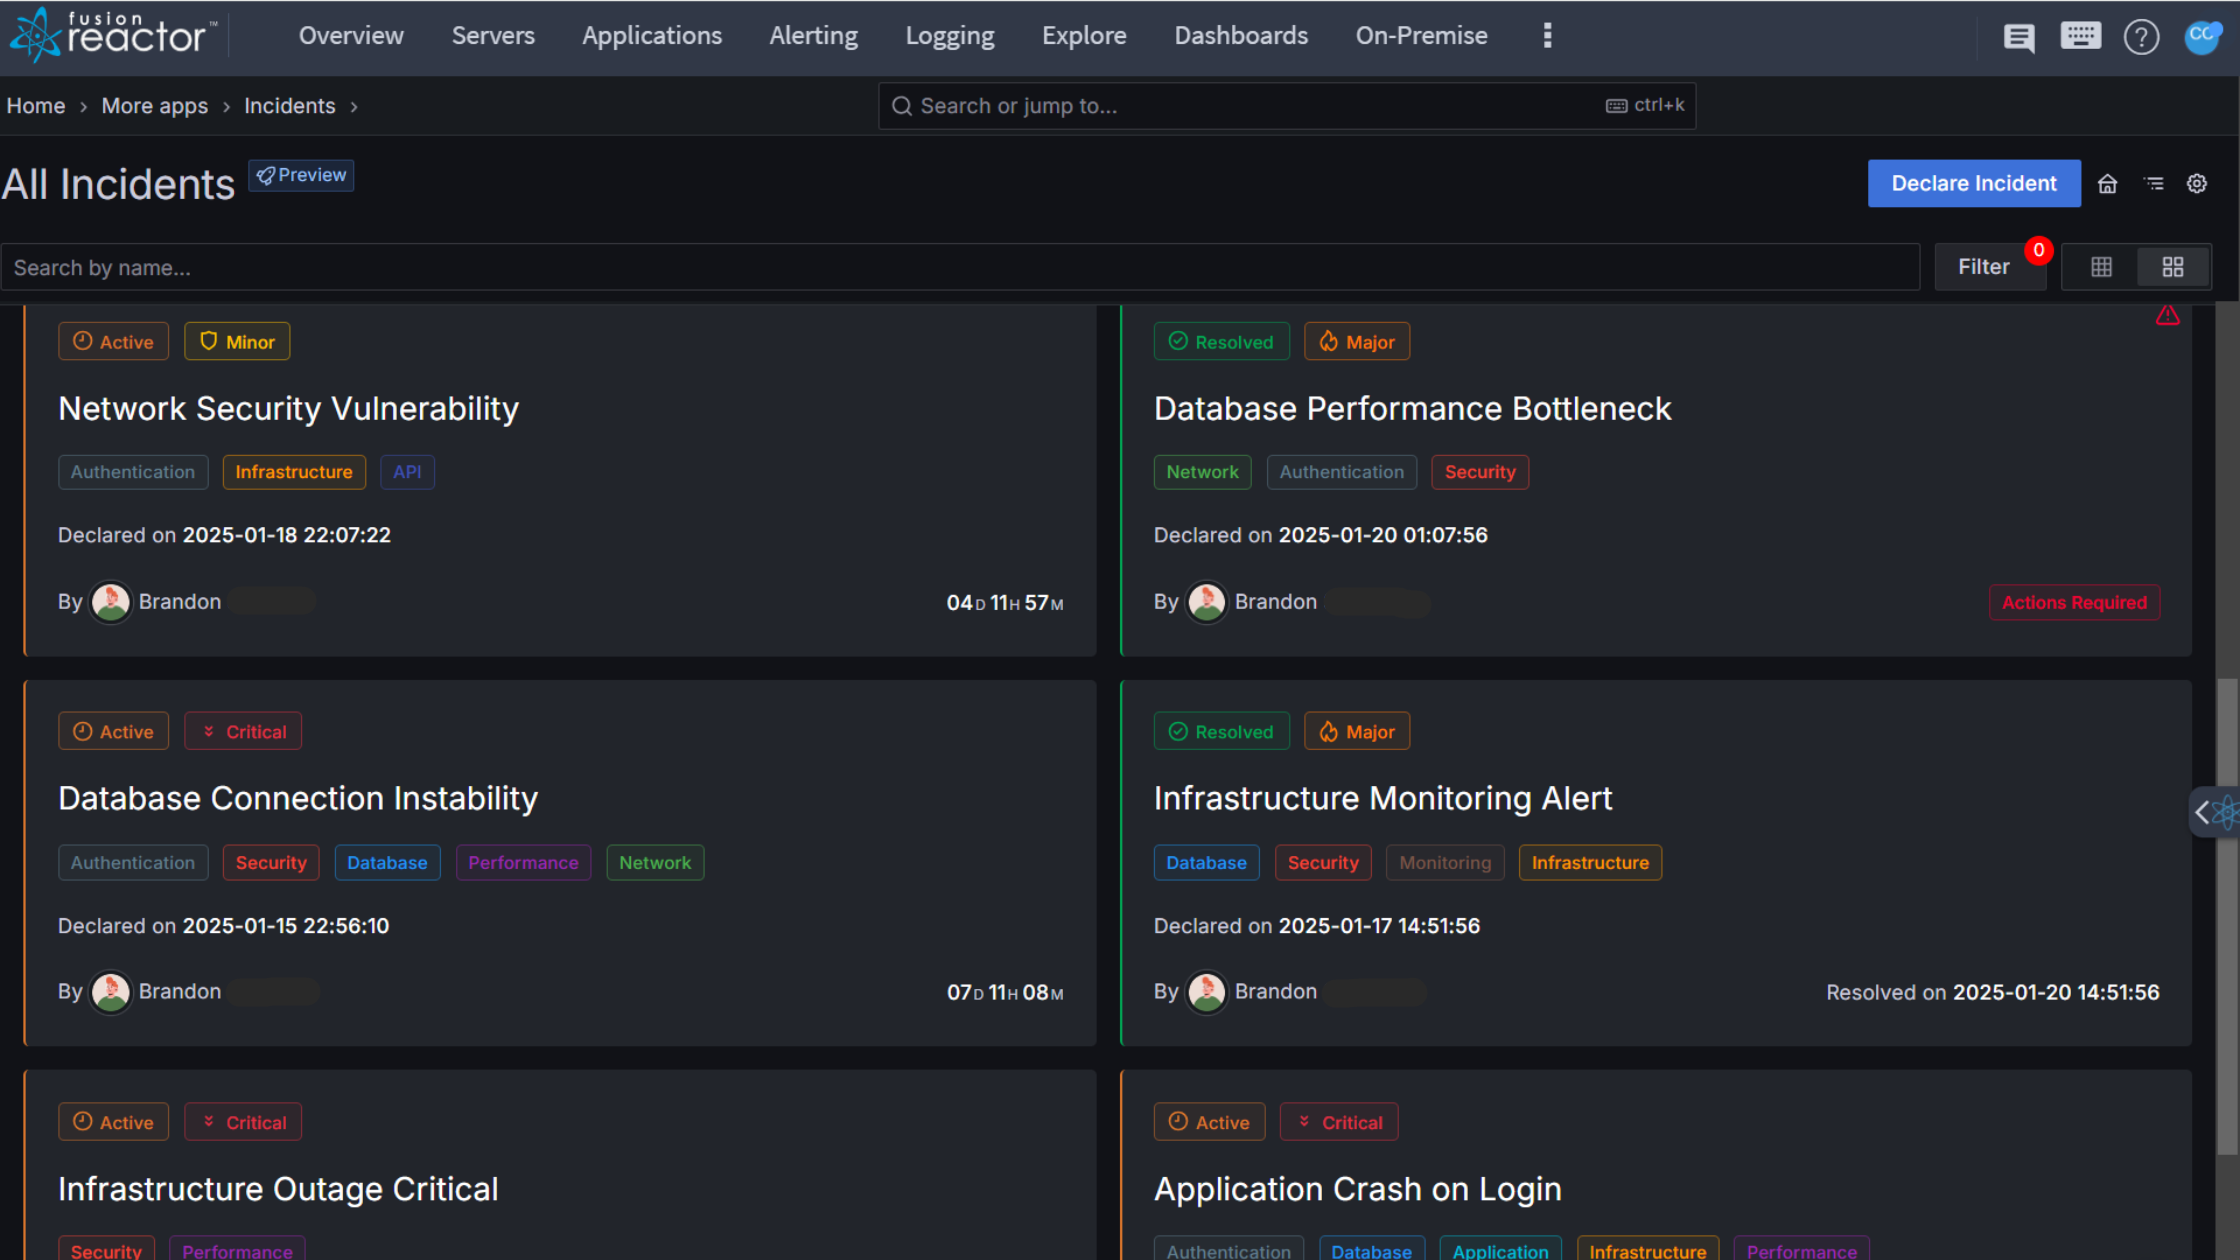
Incidents dashboard
The Incidents dashboard helps teams track, prioritize, and resolve incidents efficiently by centralizing relevant details and offering quick filtering and reporting options.
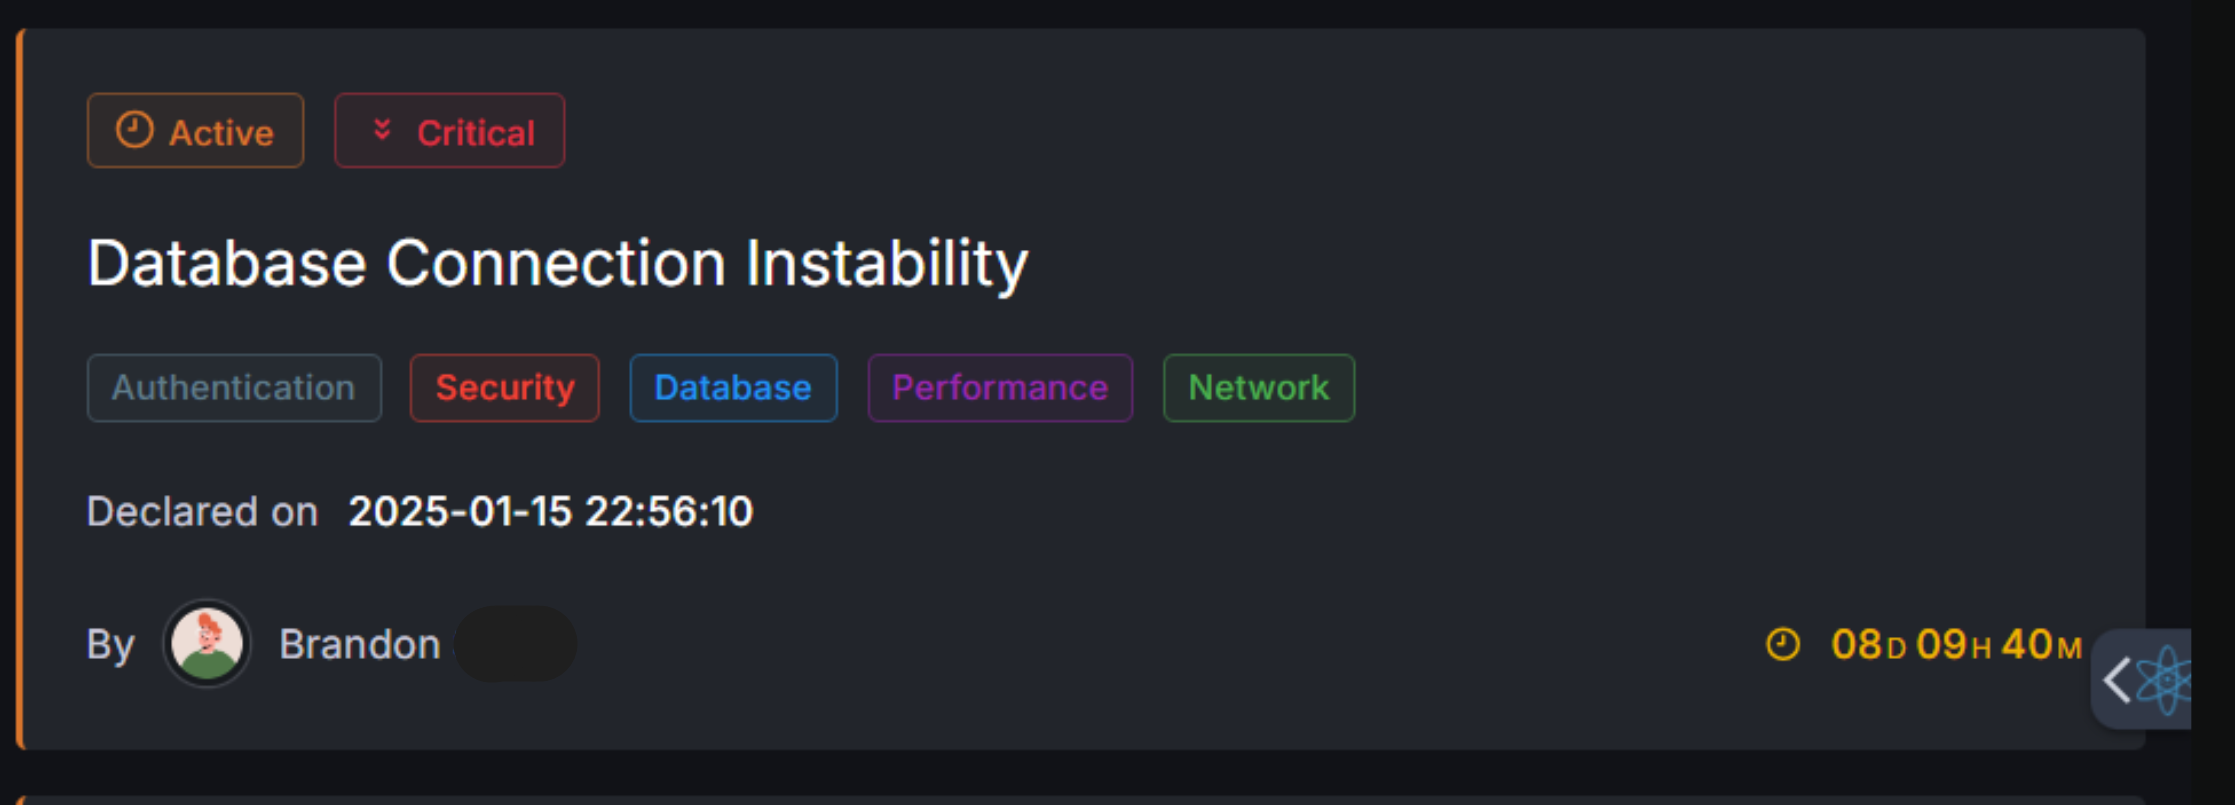
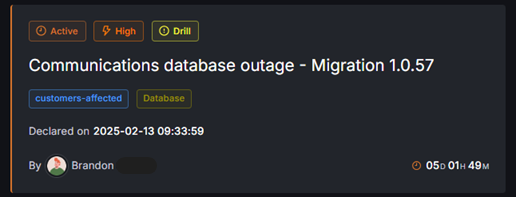
The dashboard features Incident Cards, each representing a specific incident with essential details. These details include:
- A Title, which provides a brief summary of the issue (e.g., Network Security Vulnerability).
- The Status indicating whether the incident is Active or Resolved.
- The Severity, categorized as Pending, Low, Medium, High, Critical to signify priority.
- Labels/Tags based on areas such as Security, Infrastructure, API, or Database.
- The Declared On date and time the incident was reported, along with the Reported By field, which identifies the user who logged the incident.
- An Incident Duration Timer located at the bottom-right corner displays the total time the incident has been active, starting from the moment it was declared. The time is always shown in white, but if the incident is still active (i.e., not yet resolved), an orange clock icon appears to the left of the time to indicate that it is still live.
Filtering
The filtering feature allows you to refine the list of incidents displayed on the Incidents page. This helps users quickly identify incidents based on their status, severity, associated labels or whether they are drills.
- Click the filter button (top-right corner) to open a dropdown menu containing the following options:
- Status
- Severity
- Labels
- Show drills only? (Checkbox to filter and display only drill incidents)
Info
A red notification badge (e.g., 1) will appear on the button to indicate active filters.
Key features & workflows
Create a new incident
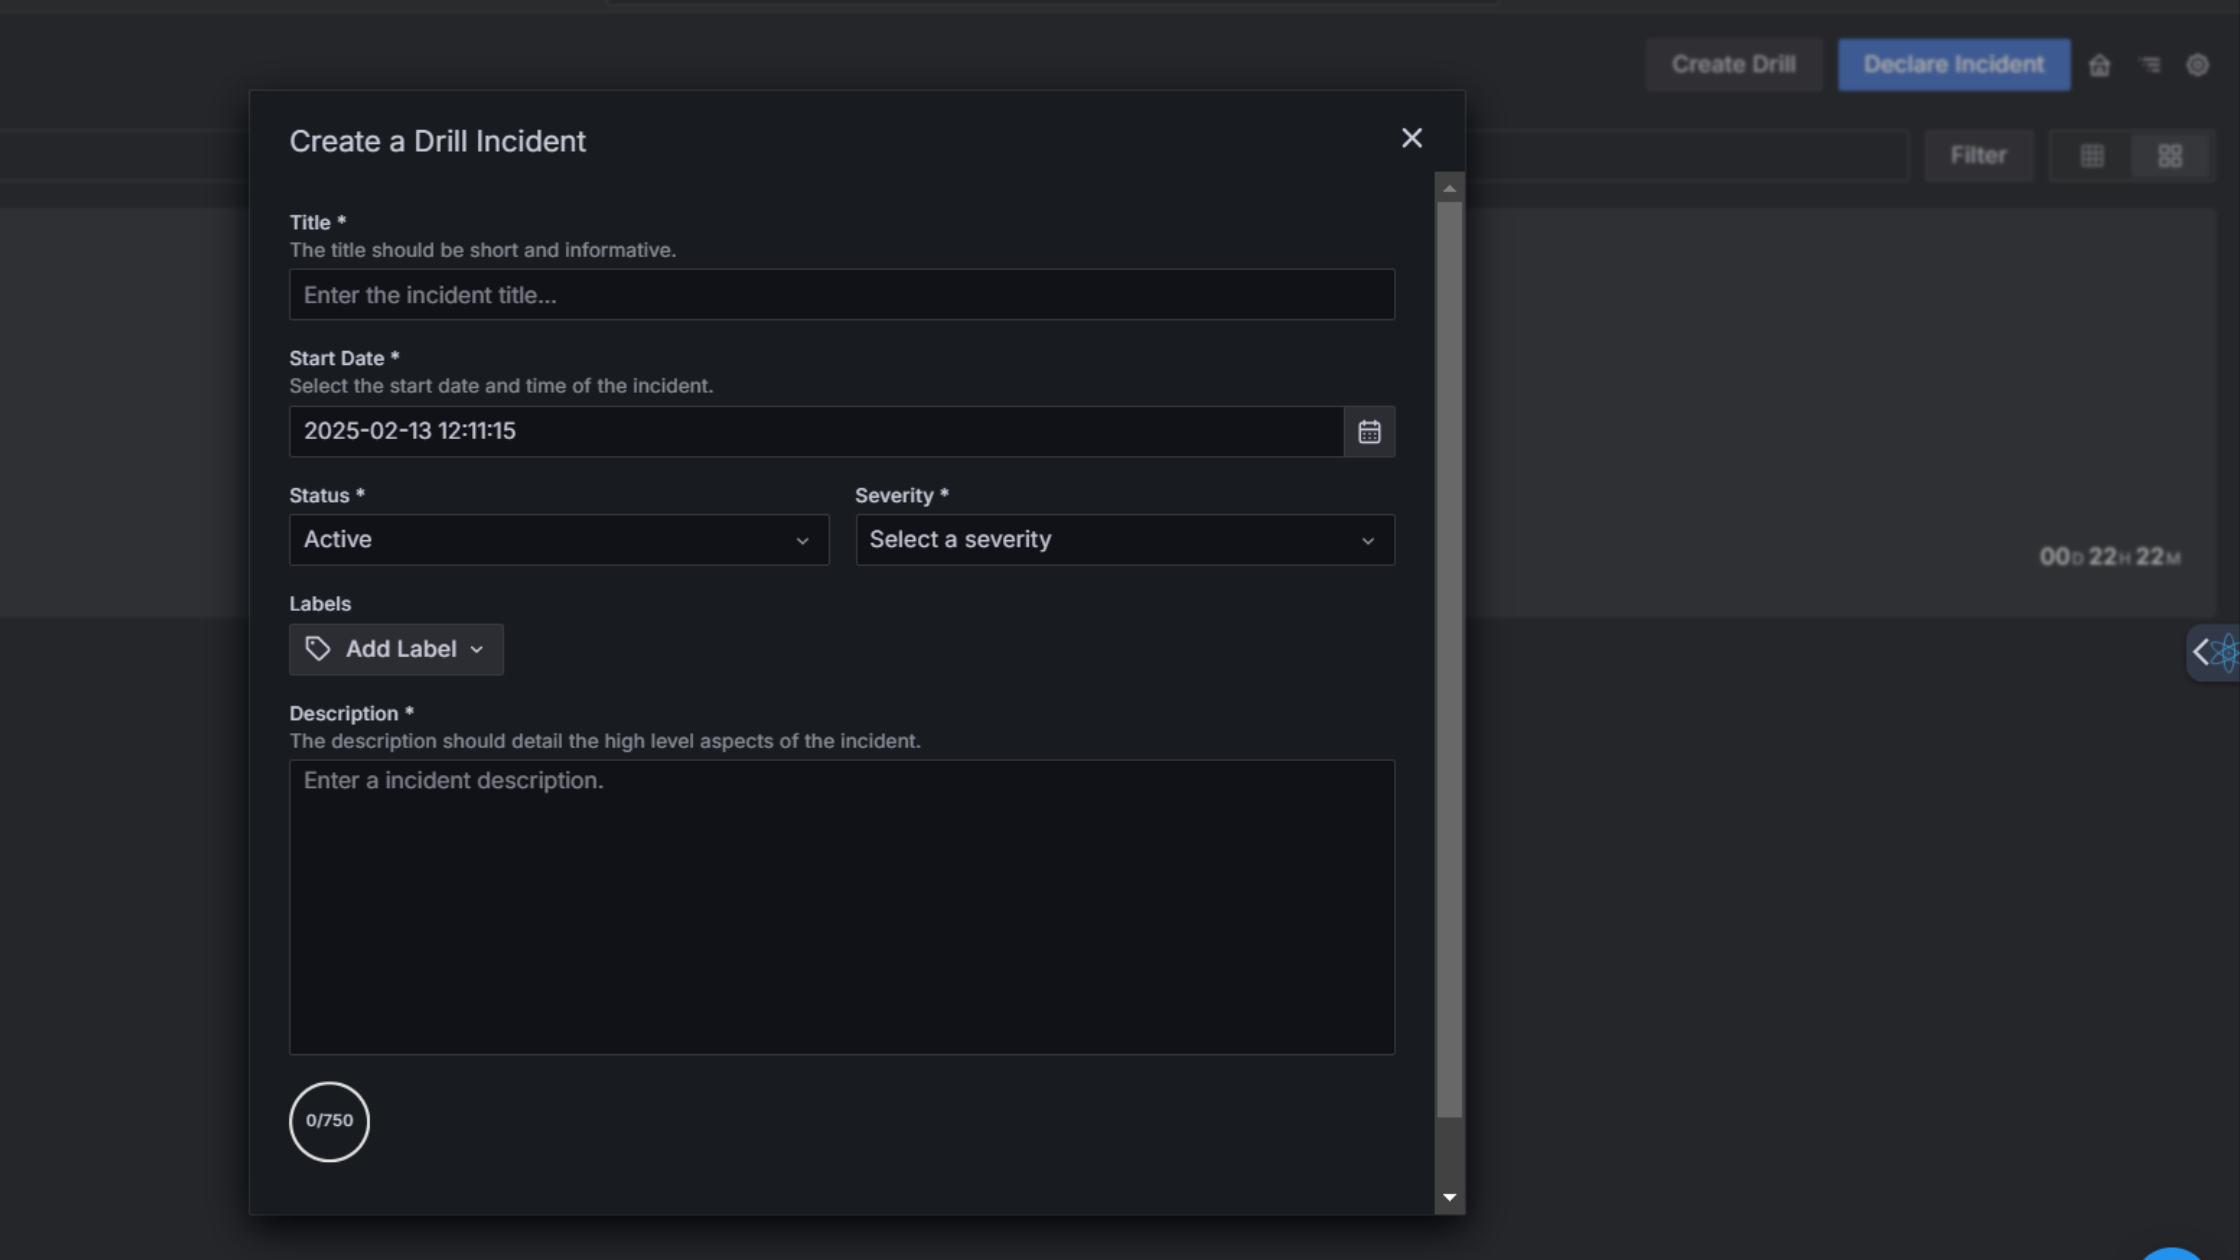
To create a new incident:
- Navigate to the Incidents page.
-
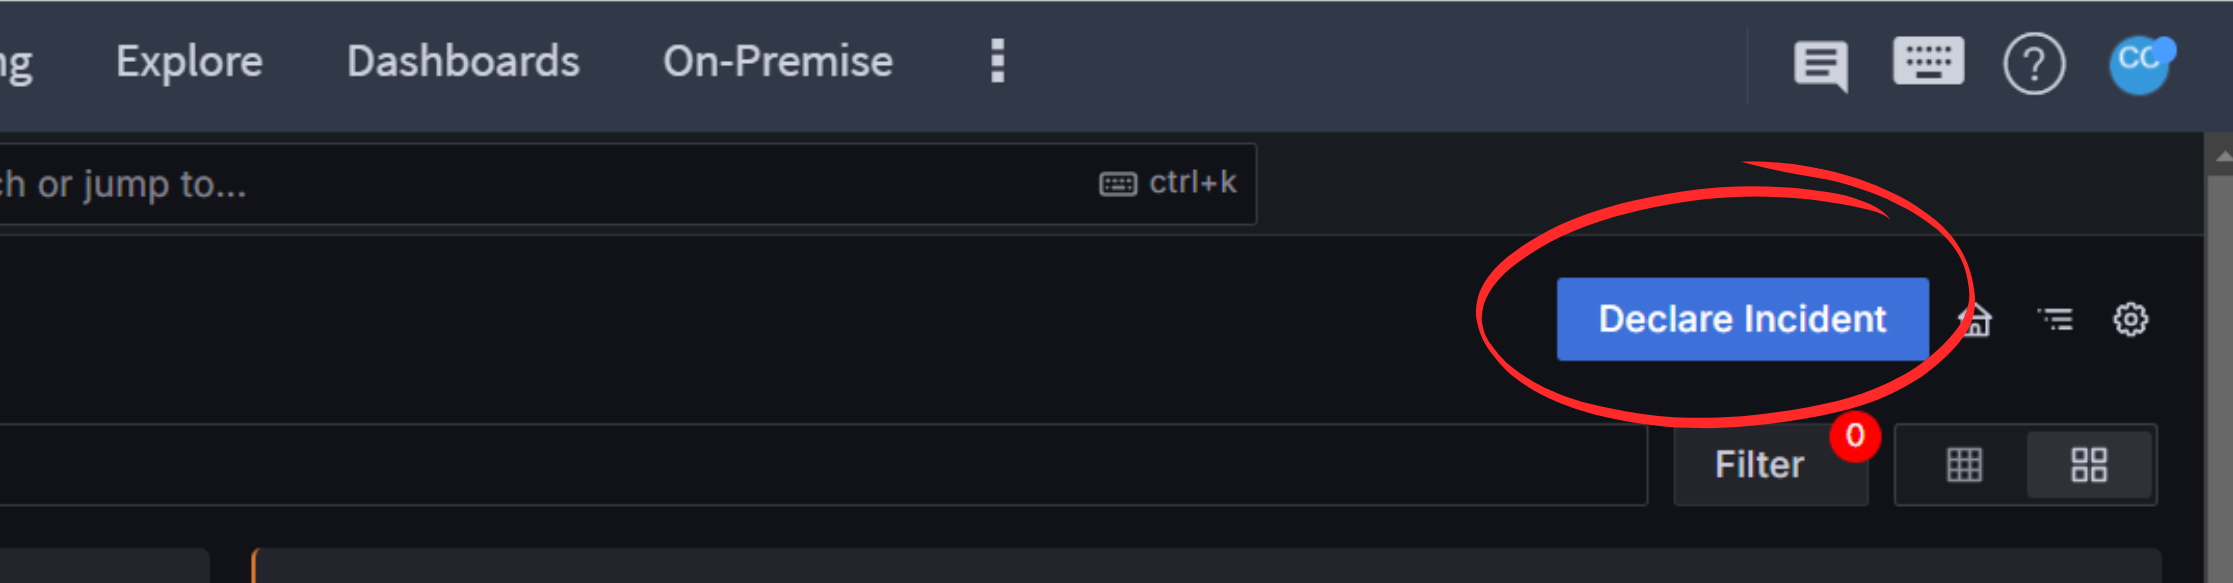
Click the Declare Incident button to open the incident creation form.
-
Fill in the required information:
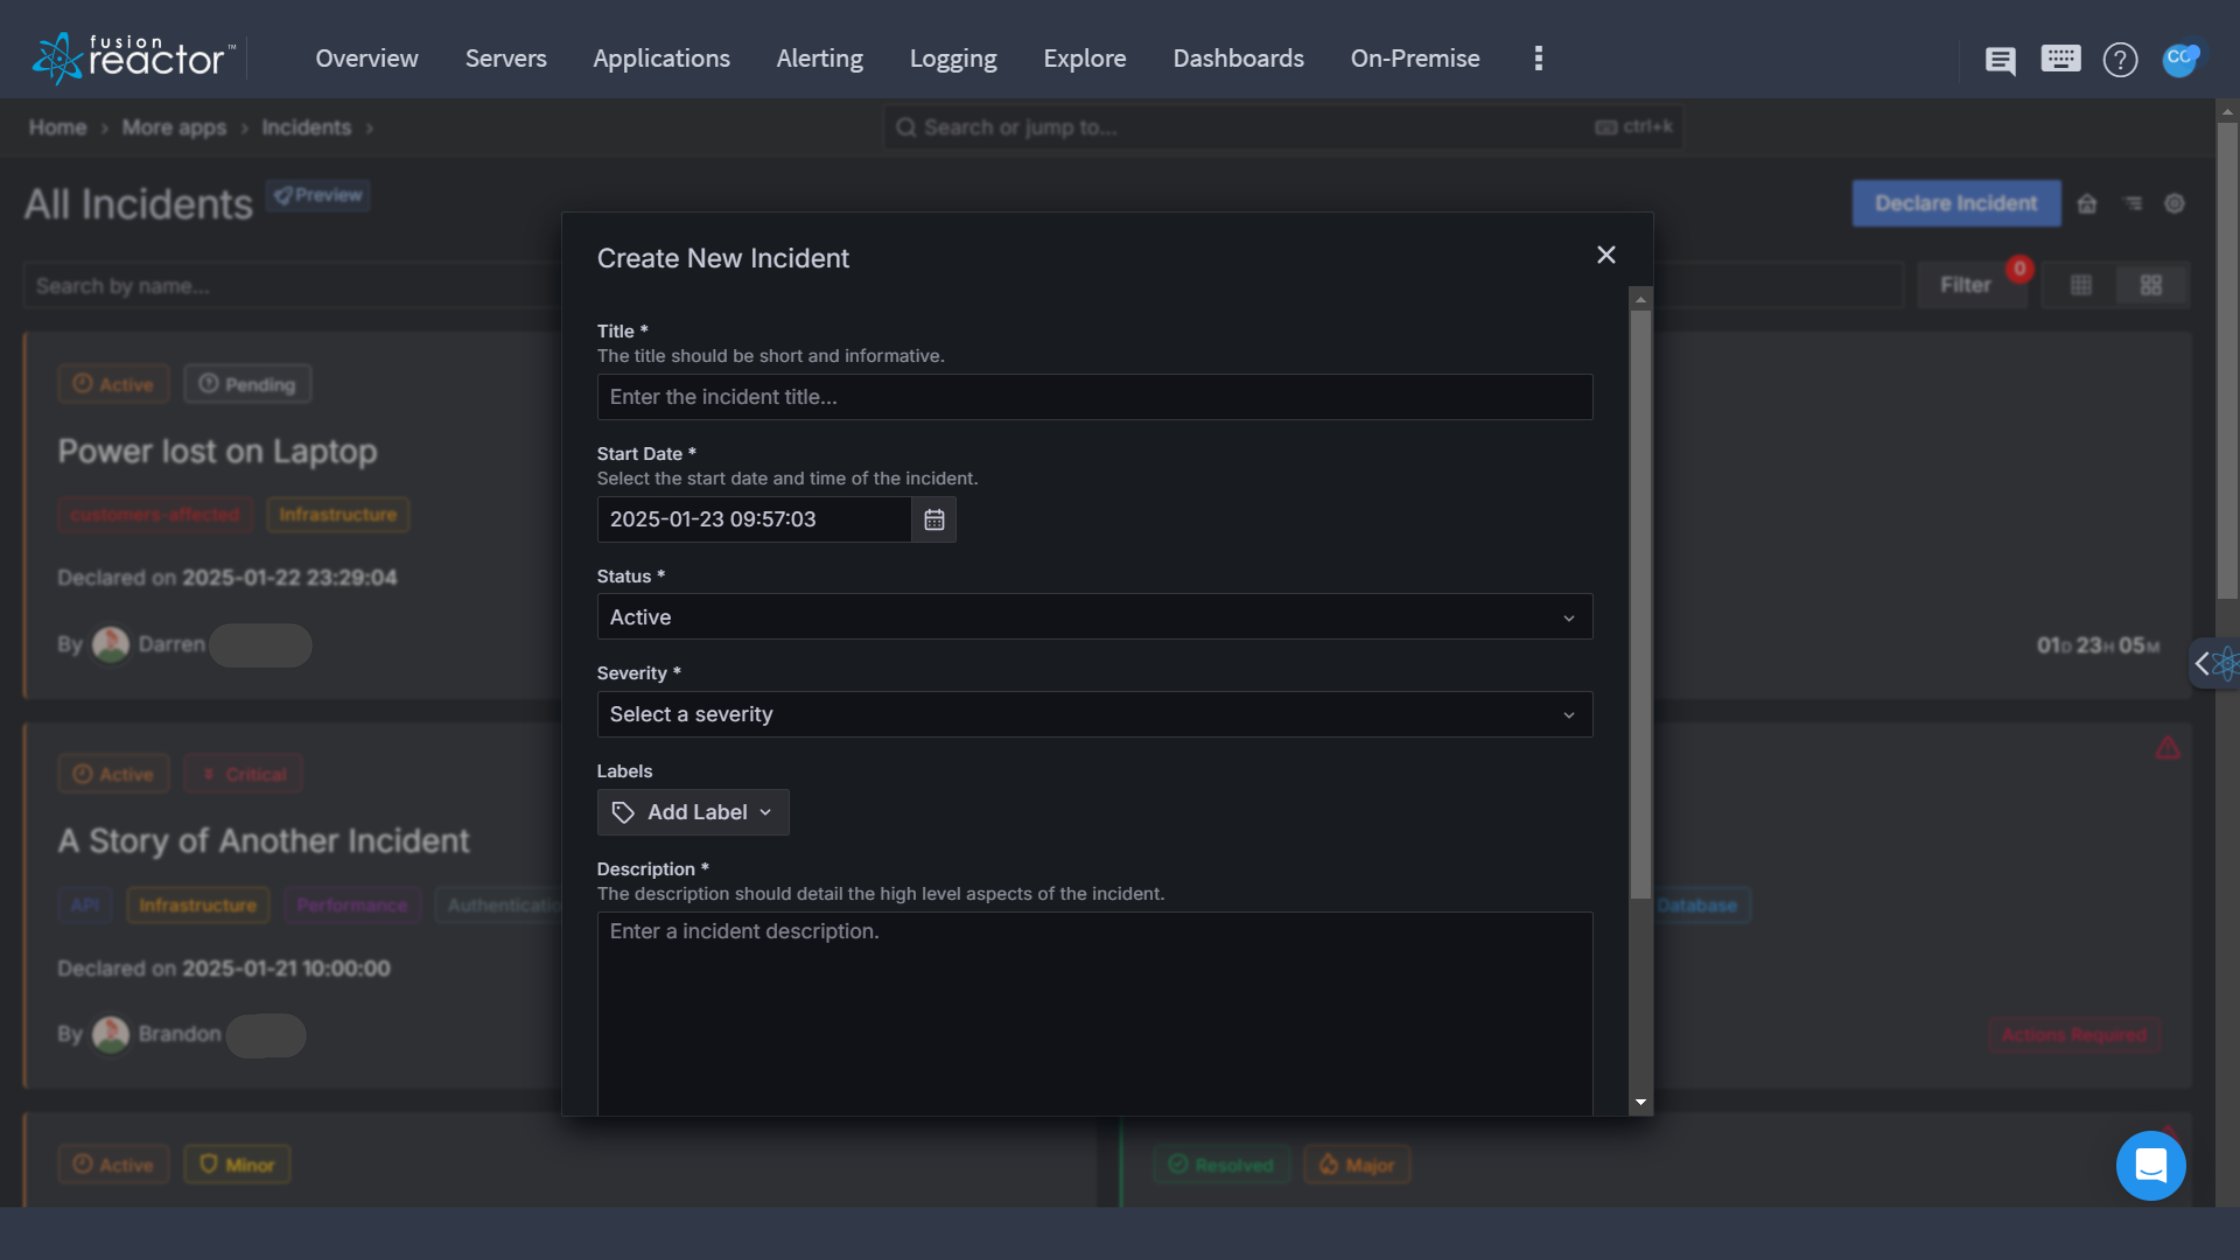
- Title: A brief description of the incident.
- Severity: Select from predefined levels (e.g., Pending, Low, Medium, High, Critical).
- Status: Set the initial status (typically Active).
- Labels: (Optional) Add tags to categorize the incident.
- Description: Provide detailed information about the incident. The Description field allows up to 1,200 characters, enabling detailed documentation of the incident.
-
Click Save to create the incident.
Info
Incident details such as title, start time, and labels can be updated at any time.
Manage tasks
FusionReactor's integrated task management system helps you coordinate incident response by organizing critical actions and assignments. Using the built-in task manager, your team can collaborate effectively, monitor progress, and ensure swift completion of all necessary response activities.
Add tasks
To add a task within a specific incident:
- Navigate to the Tasks section of the incident, located on the right-hand sidebar.
- Provide a brief description of the task.
- Click on the +Task button.
Edit tasks
To edit a task:
- Click on a task to edit details.
- Assign tasks to different team members as needed.
- Mark tasks as complete when finished.
Filter tasks
Tasks can be filtered by status within a specific incident using the status dropdown/dropdown filter.
Update task status
Tasks have three statuses:
- To Do
- In Progress
- Done
To update a task's status:
- Click the checkbox next to the task.
- Each click cycles the task through the statuses in the following order:
- To Do → In Progress → Done
Assign tasks
Task assignment ensures clear accountability and provides visibility into ongoing activities.
To assign a task:
- Click on the people + icon next to the task.
- Search for and select the user you want to assign the task to.
Tip
Tasks can be unassigned or reassigned at any time. Simply click the assigned user, then choose Unassign User or search for another team member to reassign the task.
Real-time updates & notifications
FusionReactor’s Incidents feature provides real-time collaboration capabilities, ensuring that teams stay informed and aligned while responding to incidents. These live updates reduce miscommunication and improve response efficiency.
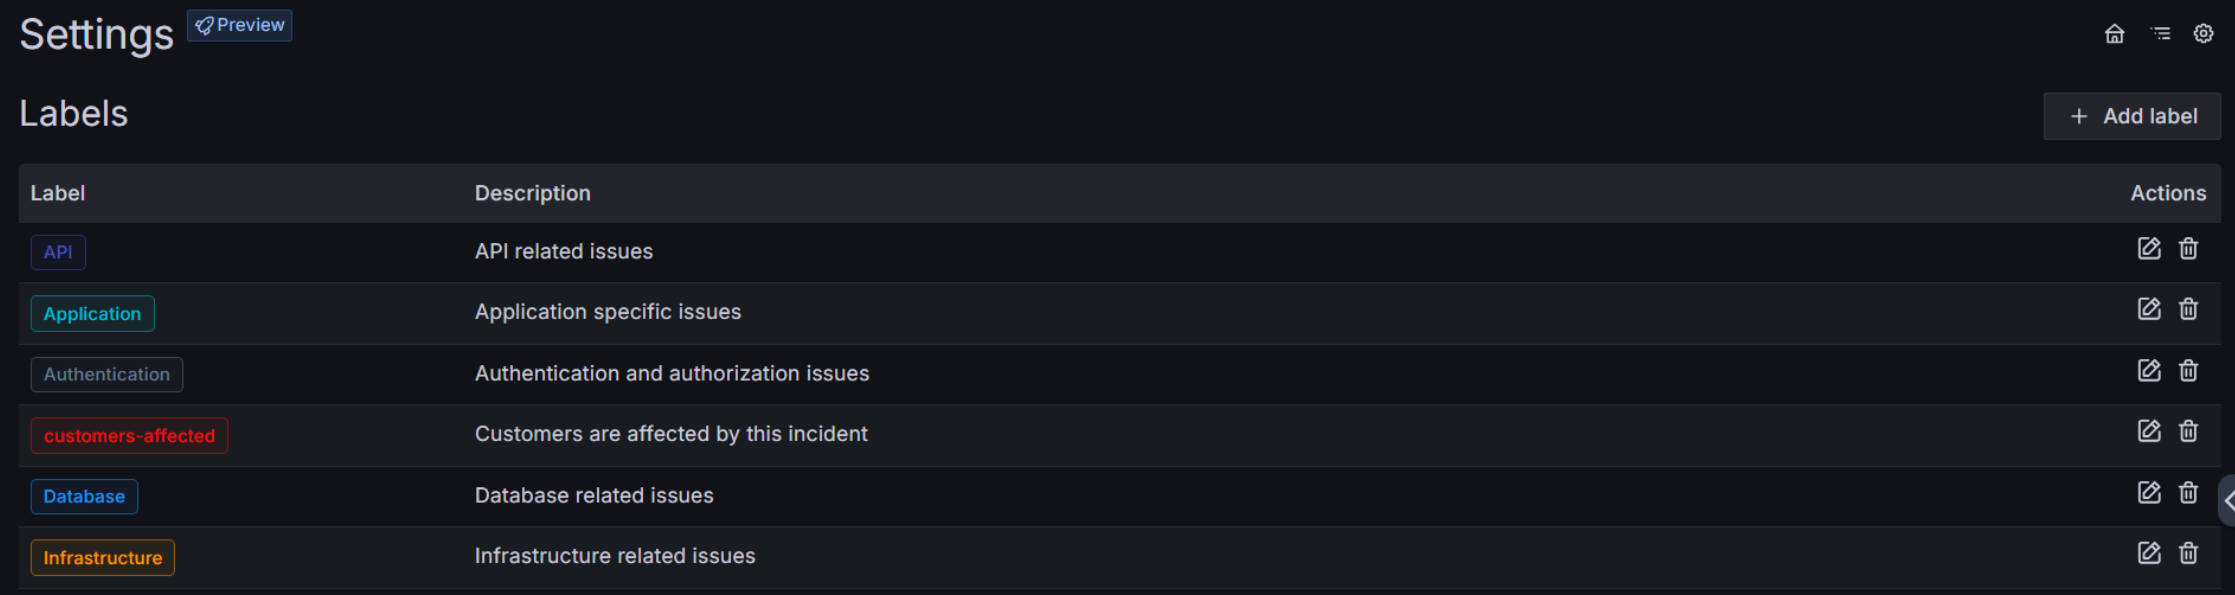
Label management
Labels transform your incident data into actionable insights by capturing key details like affected services, team involvement, and customer impact. Apply consistent labels to easily track patterns, filter similar incidents, and analyze trends across your incident history. This metadata becomes invaluable for identifying recurring issues, measuring team performance, and strengthening your incident response process over time.
Add labels
Labels are added during incident creation or via the Add Label button on the incident details page.
New labels
- Navigate to the Settings page using the cog icon.
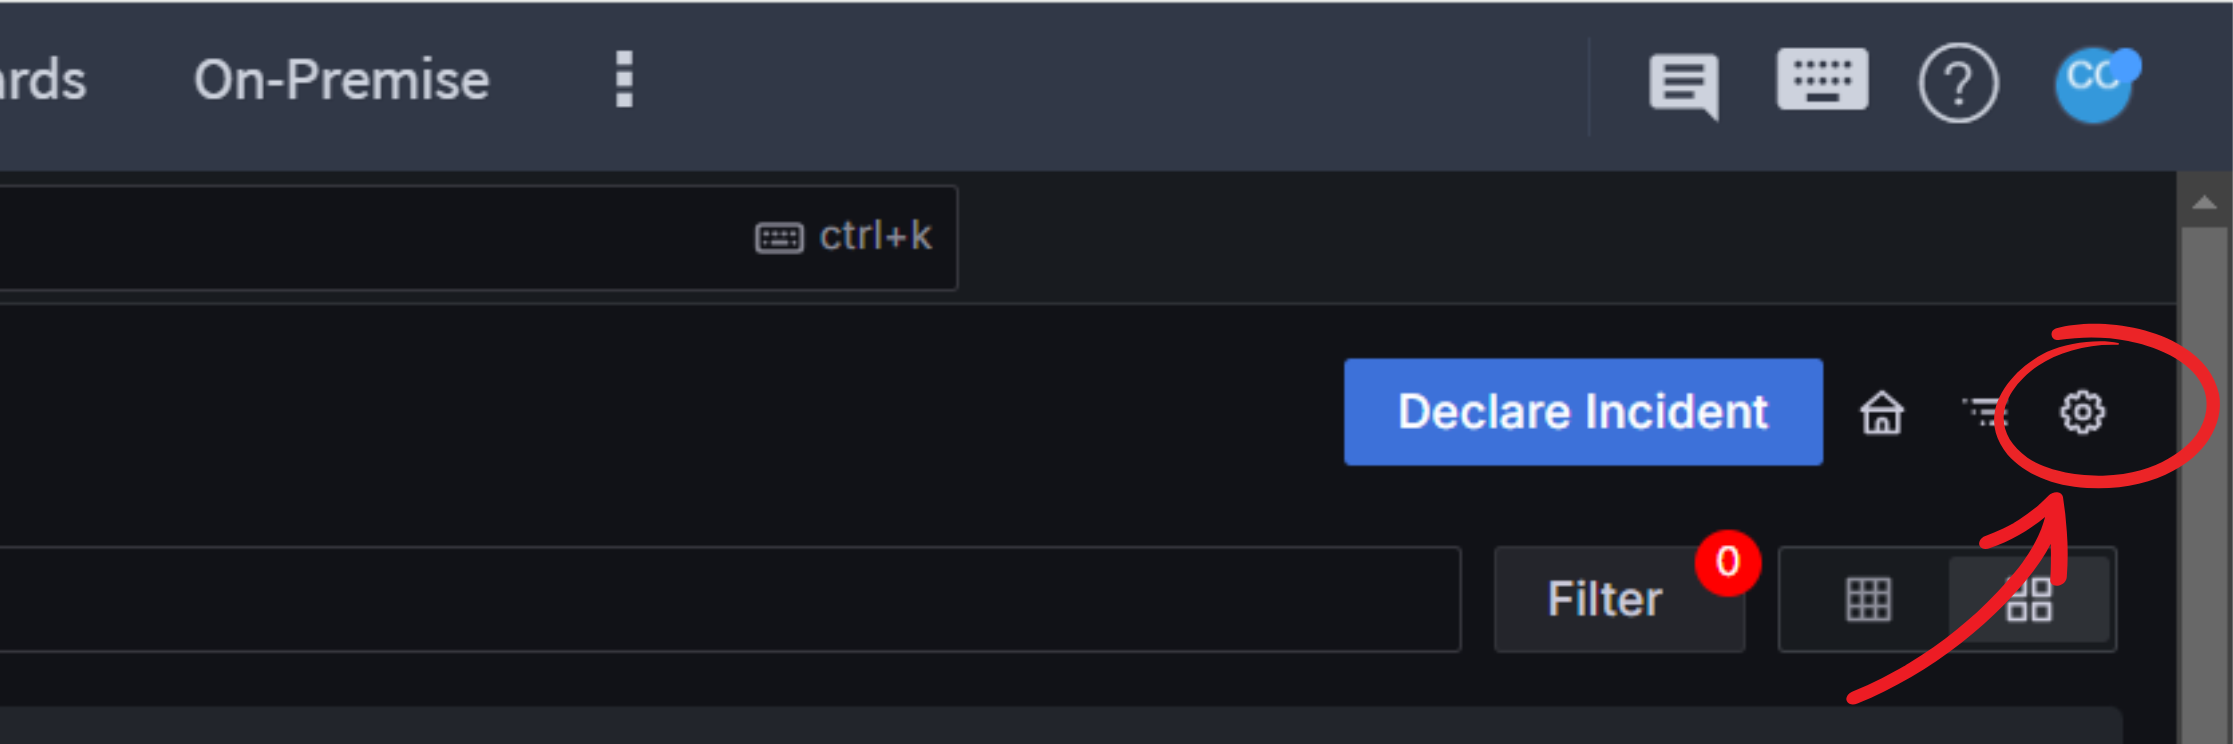
- Select + Add label
- Enter a name.
- Choose a color.
- Add a description.
Tip
Remove labels from an incident by clicking the x on the label badge.
Add comments/activities
Keep the incident timeline organized by adding formatted notes and updates about response activities.
- In the Activity section, use the rich text editor to:
- Write comments.
- Format text or add links.
- Click Add note to post your comment.
- Comments appear chronologically in the activity timeline.
Info
The ellipsis button on comments in the activity timeline allows users to edit their posts.

Update incident status
An incident's status instantly communicates whether your team is actively responding or has resolved the issue. Active incidents show there's ongoing work to restore service, while resolved status signals that normal operations have resumed. This clear indicator helps everyone from responders to stakeholders know at a glance if they need to take action or can stand down.
To update an incident status:
- Use the Status dropdown on the incident details page.
- Select a new status:
- Active or Resolved.
- If resolving the incident:
- Provide a resolution summary.
- Confirm the status change.
Adjust severity
Incident severity levels tell you how serious an incident is and how quickly you need to act. By using consistent severity ratings, everyone in your organization can immediately understand how urgent each incident is and what response is needed.
Setting clear severity levels helps your team know who to involve and what actions to take. Define each severity level with specific criteria and response requirements so your team can respond effectively and consistently.
To adjust severity:
- Click the Severity indicator on the incident.
- Select the desired severity level (e.g., Pending, Low, Medium, High, Critical).
- Changes are automatically logged in the activity timeline.
Email notifications
Users will receive automatic email notifications for key updates related to incidents they are involved in. These notifications ensure that all relevant stakeholders stay informed about important changes and assignments.
Users will receive an email notification in the following situations:
- Role Assignment: When they are assigned to a role on an incident.
- Task Assignment: When they are assigned a task related to an incident.
- Incident Status Change: If the status of an incident they are assigned to changes.
- Incident Severity Change: If the severity level of an incident they are assigned to changes.
Note
Currently, there is no option to opt out of these email notifications. Notifications will always be sent to ensure users remain updated on critical incident developments.
Drill incidents
The Drill Incidents feature allows teams to simulate real-world incident scenarios in a controlled environment. These drills help improve response readiness, validate processes, and identify areas for improvement.
Create a drill
To create a new drill incident:
- Navigate to the Incidents page.
-
Click the Create Drill button to open the Create a Drill Incident form.

-
Fill in the required details:
- Title: A brief description of the drill incident.
- Severity: Select from predefined levels (e.g., Pending, Low, Medium, High, Critical).
- Status: Set the initial status (typically Active).
- Labels: (Optional) Add tags to categorize the incident.
- Description: Provide detailed information about the drill incident.
-
Click Save to launch the drill.
Manage a drill
Once a drill incident is created, it functions like a regular incident but does not impact production workflows. Key features include:
- Task Assignments: Assign and track drill-specific tasks.
- Status Updates: Change the status from Active to Resolved once the drill is complete.
- Activity Timeline: Monitor actions taken during the drill for later review.
Special features
Activity timeline
The interactive timeline serves as your incident command center, providing a chronological view of all incident activities and enabling seamless collaboration. Responders can quickly scan past actions, review relevant context, and determine next steps without switching between multiple tools.
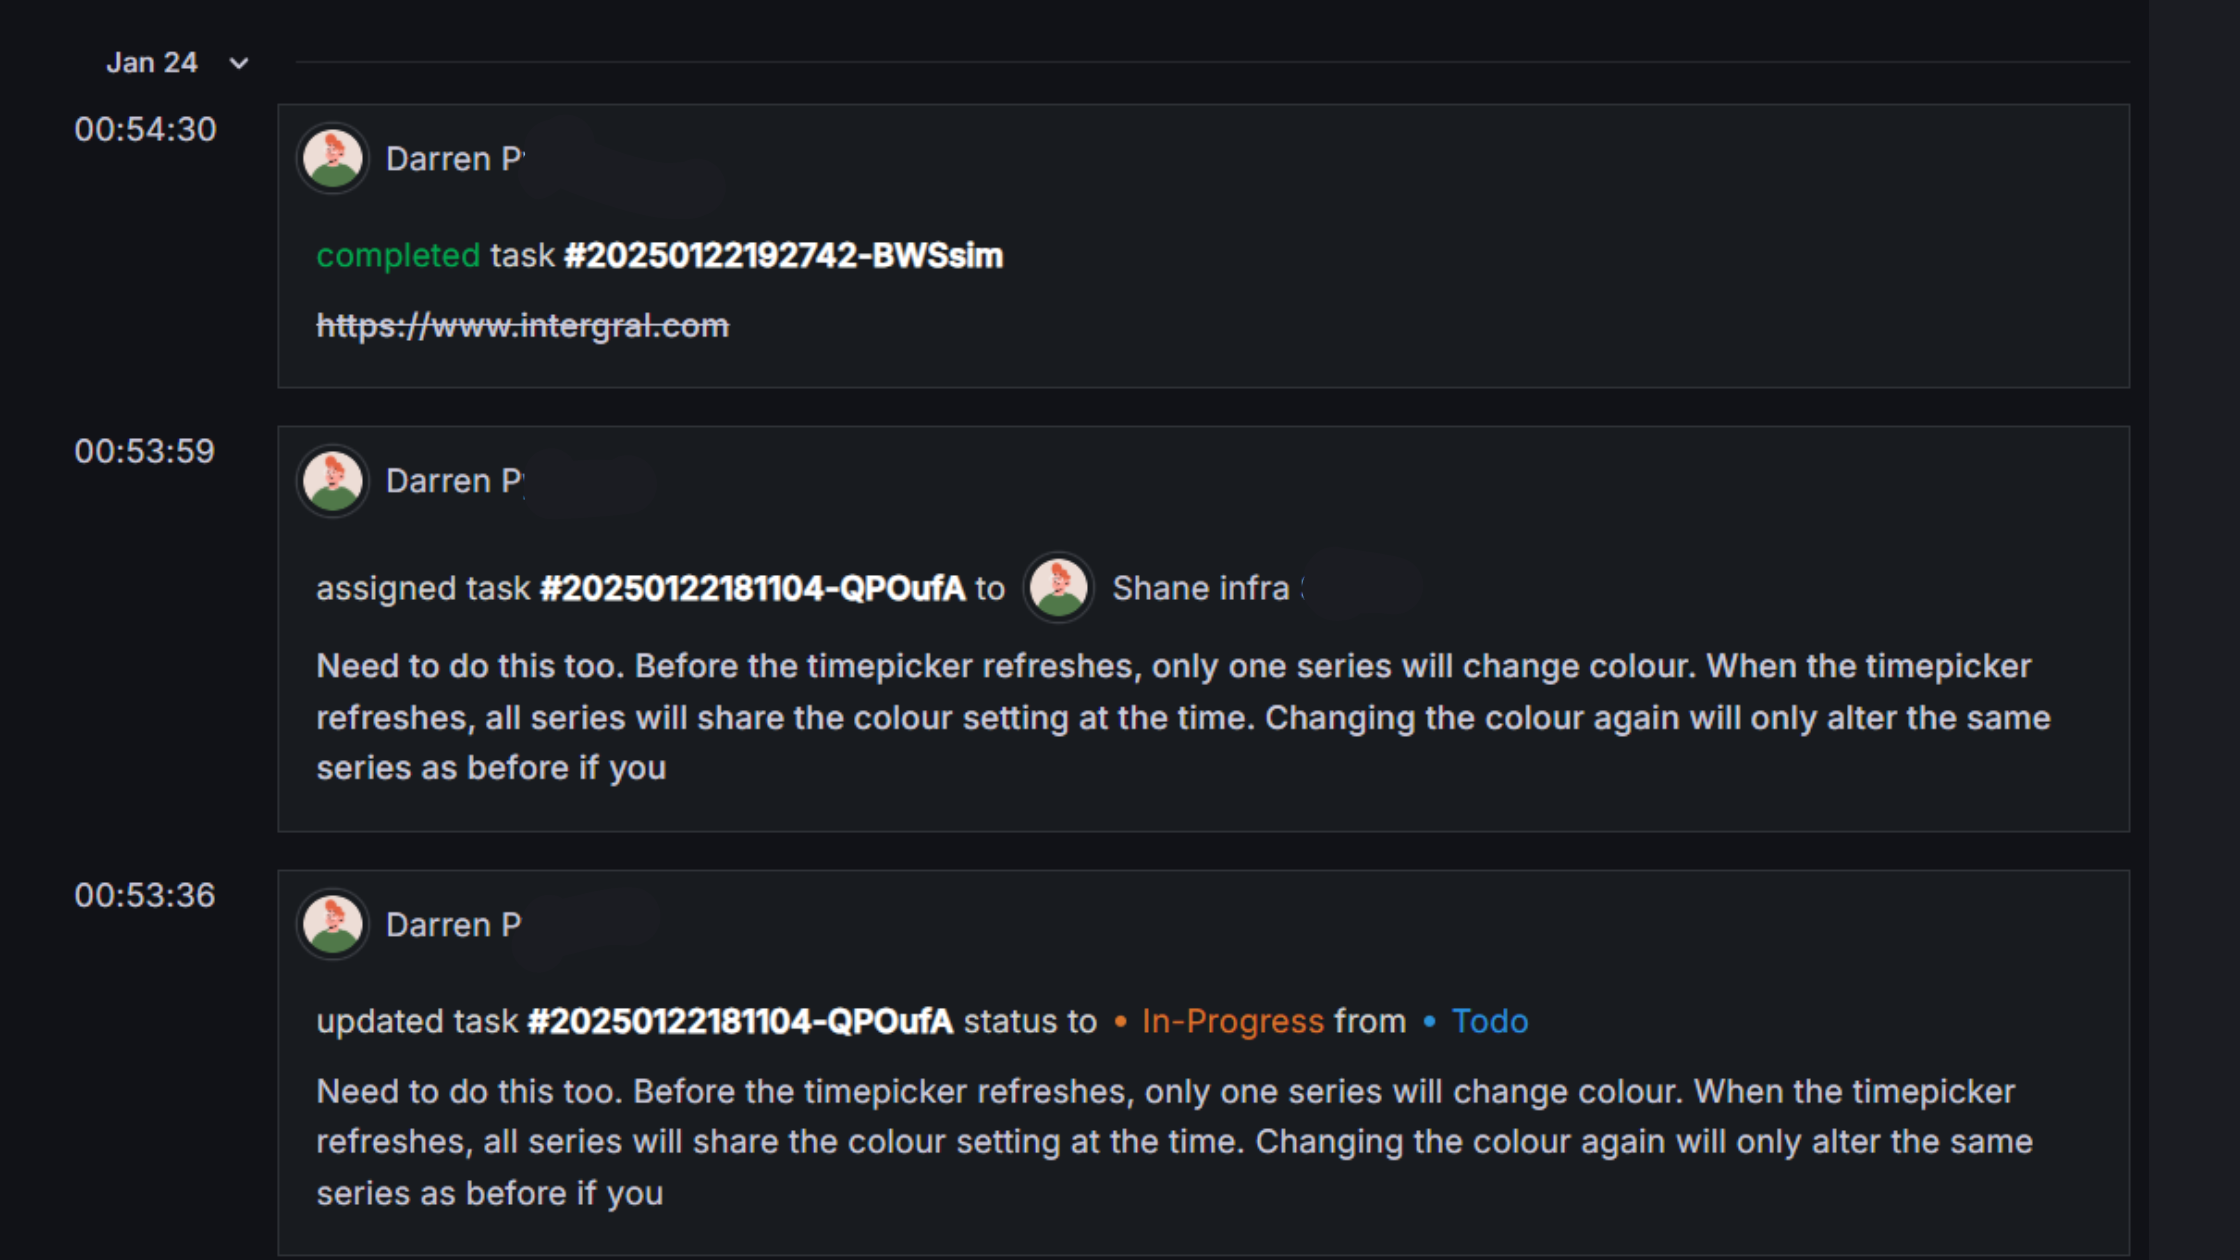
The Incident Activity timeline:
- Automatically logs all actions, including:
- Status changes
- Comments
- Task updates
- Provides a clear audit trail of who made changes and when.
Tasks on Active Incidents
Task management streamlines incident response by keeping teams coordinated and accountable for specific actions. The Tasks on Active Incidents dashboard provides a comprehensive view of all incident-related tasks, organized into clear sections.
Info
Access this view by clicking the task page icon in the navigation menu.
![]()
Overview
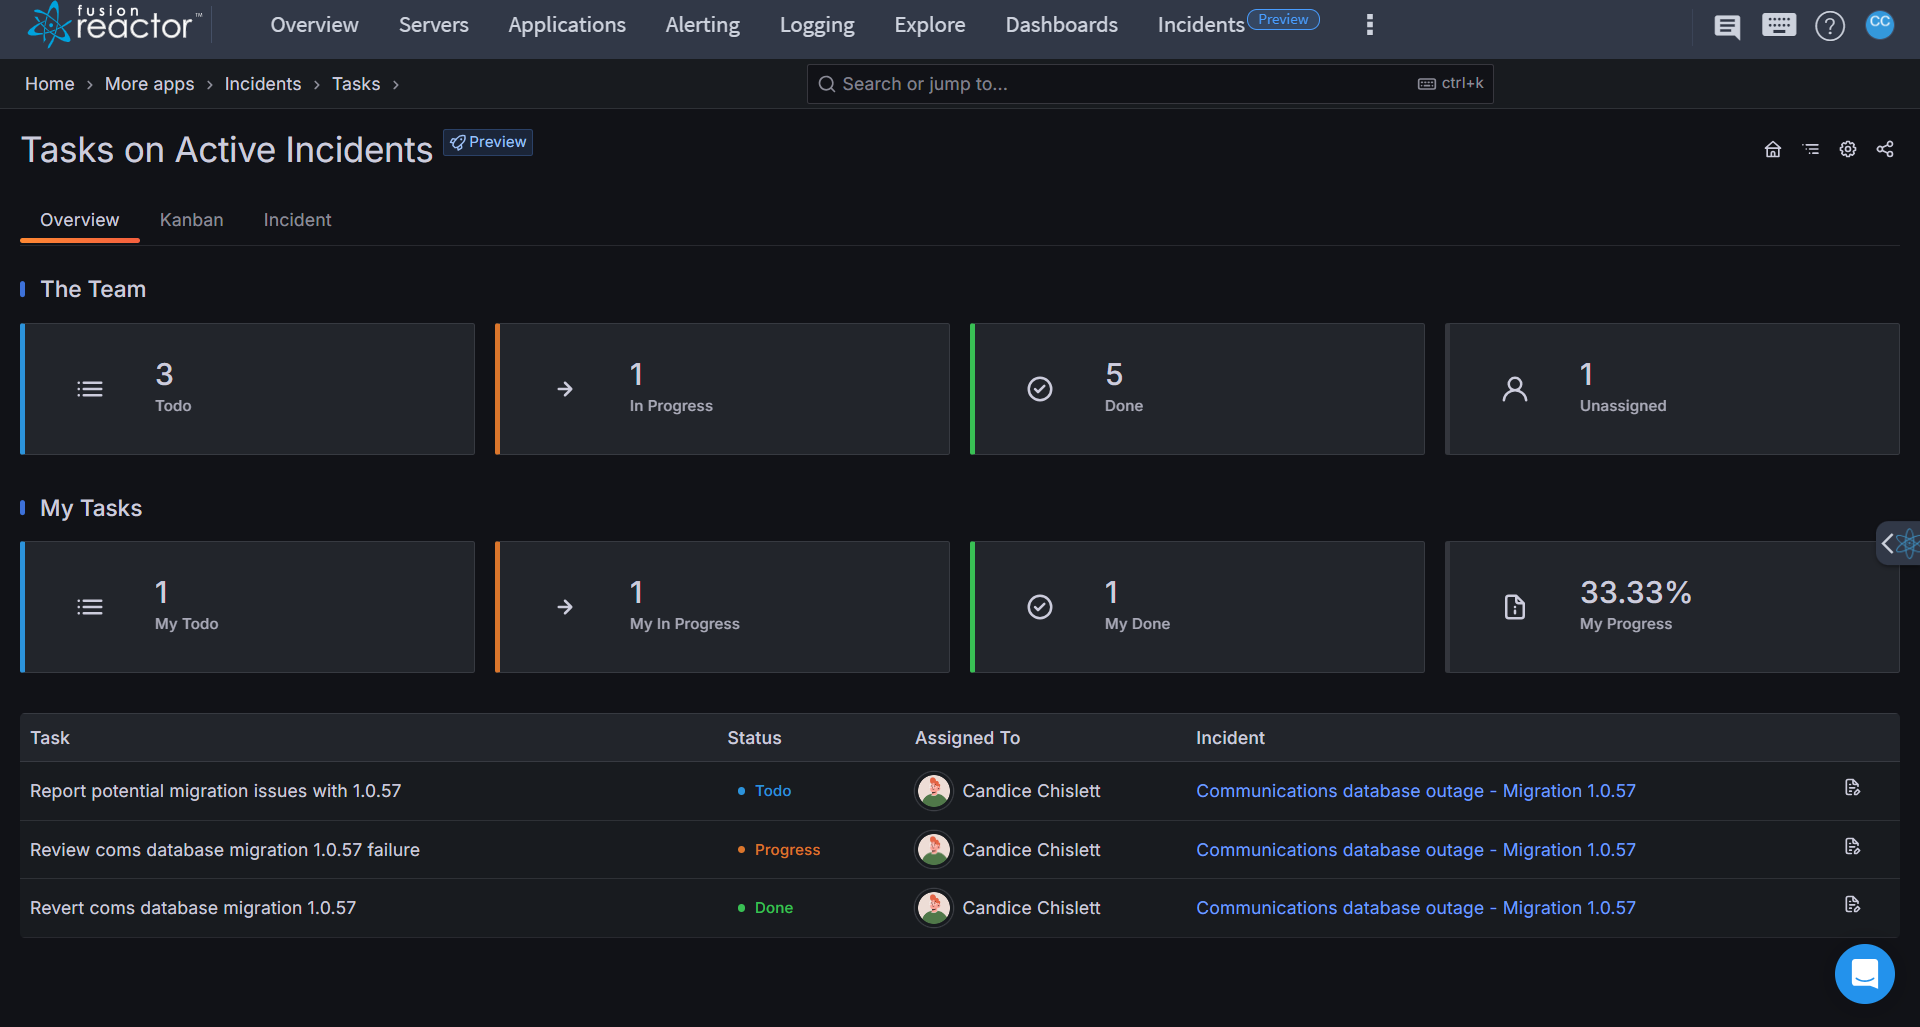
The overview dashboard displays tasks in three key categories:
-
The Team: Shows overall task distribution
- Todo: The number of tasks that have not been started by any team member.
- In Progress: The number of tasks the team are currently working on.
- Done: The number of tasks successfully completed by the team.
- Unassigned: The number of tasks that have not yet been assigned to any team member.
-
My Tasks: Displays your personal task breakdown.
- My Todo: The number of tasks assigned to you that have not been started.
- My In Progress: The number of tasks you are currently working on.
- My Done: The number of tasks you have completed.
- My Progress: The percentage of tasks you've completed out of your total assigned tasks for active incidents.
Info
Tasks marked as done will only appear in the My Done section while the incident remains active. Once the incident is resolved, they will no longer be shown there.
-
Task list view: Displays your assigned task information as a list.
- Task description
- Current status (Todo, Progress, Done)
- Related incident
Tip
Edit a task here by clicking on the task title or selecting the edit icon on the right. Quickly modify its status, reassign it to another team member, or update the task description.
Kanban view
The Kanban view on All Tasks is designed to streamline task management related to incidents. It organizes tasks into three primary columns: To Do, In Progress, and Done, allowing users to easily track the status and progress of incident-related activities.
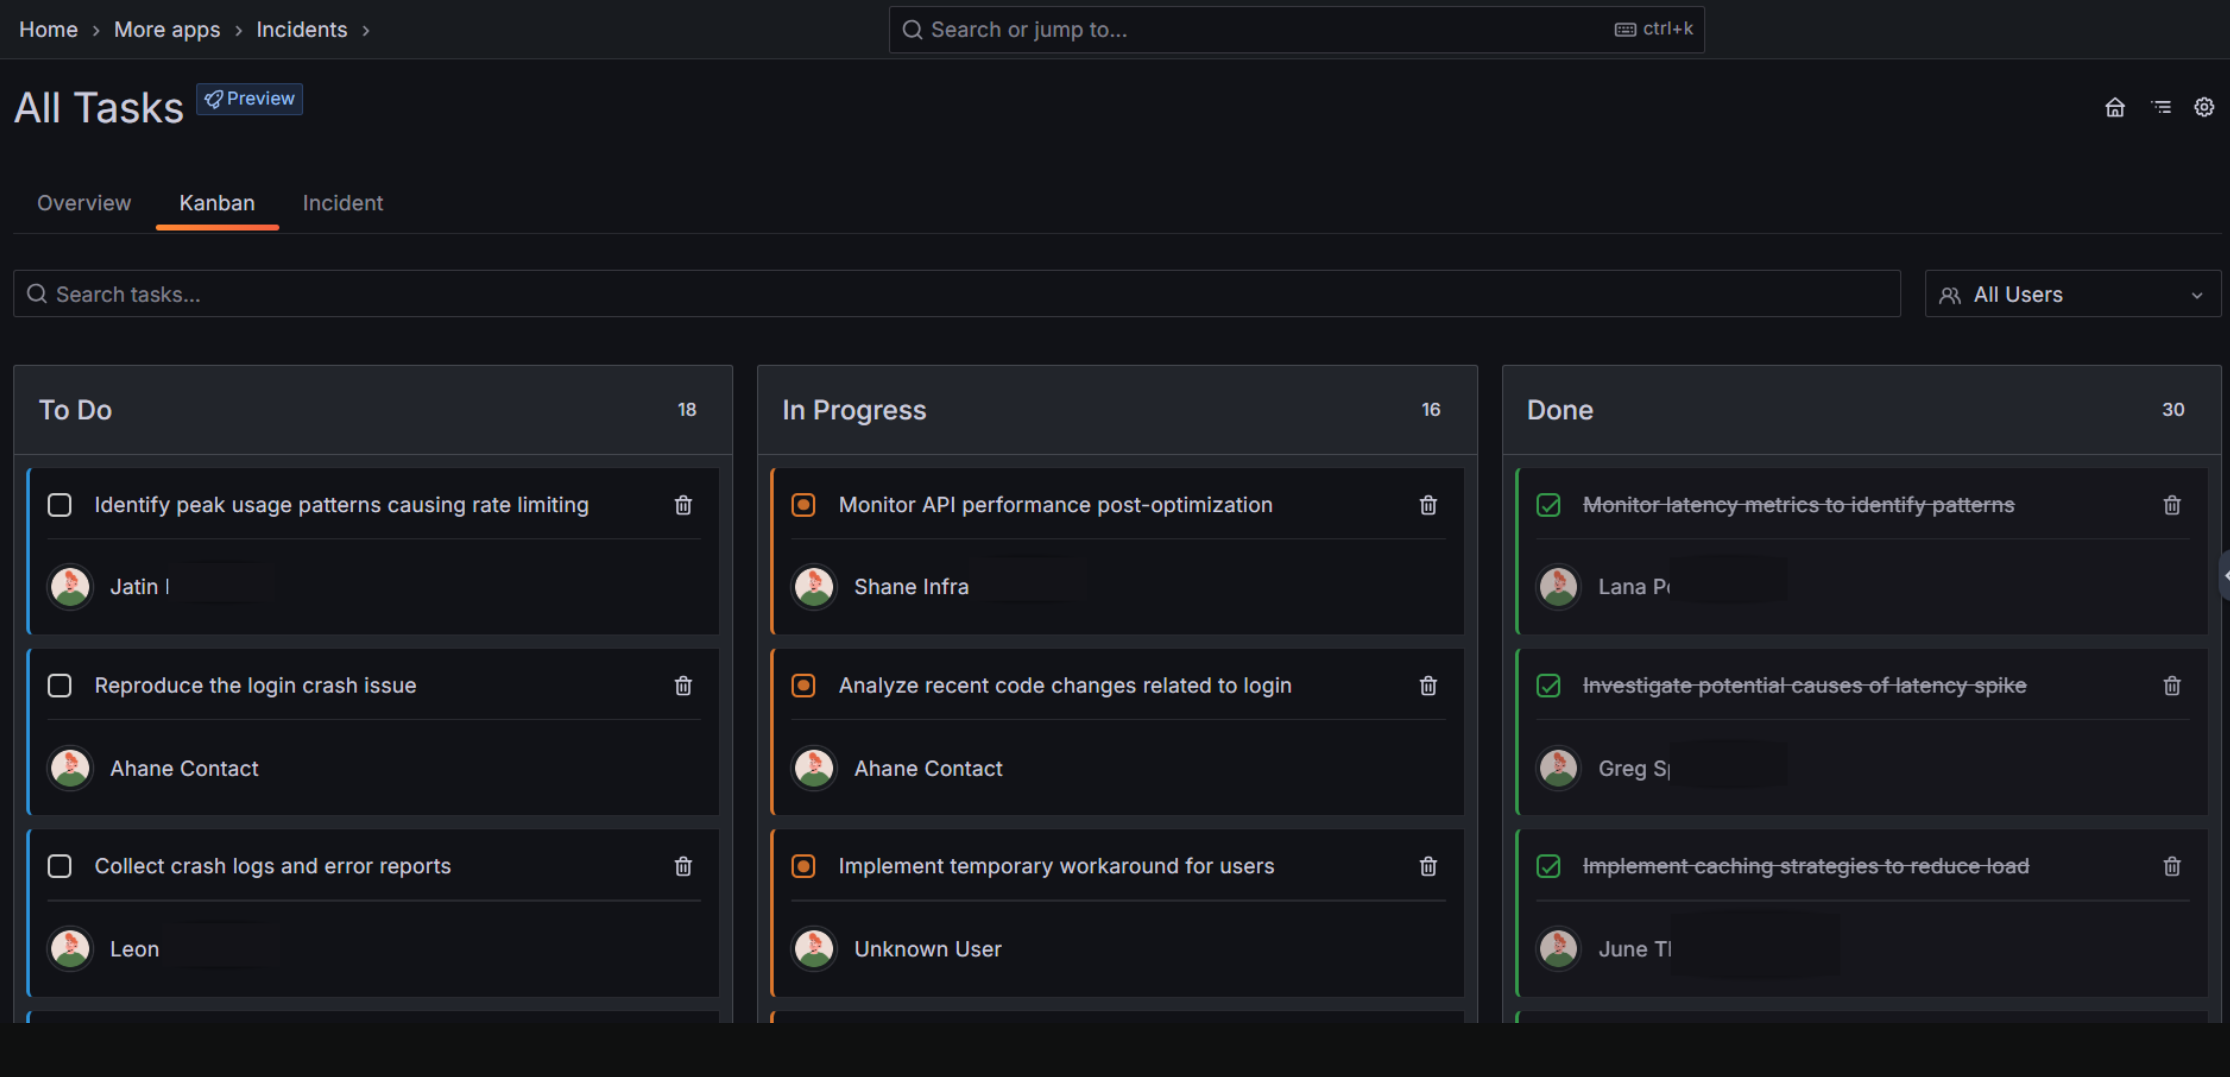
Key Features
-
Columns:
- To Do: Contains tasks that are yet to be started. Each task is assigned to a specific team member, whose name and avatar are displayed.
- In Progress: Displays tasks currently being worked on, with a clear indication of the assignees.
- Done: Shows completed tasks with a green checkmark for quick identification.
-
Task Cards: Each task is represented by a card with the following details:
- Task Title: A concise description of the task (e.g., "Reproduce the login crash issue").
- Assigned User: Displays the name and profile avatar of the user responsible for the task.
- Actions: Includes the option to delete a task for cleanup or reorganization.
-
Search and Filter:
- A search bar at the top allows users to find specific tasks quickly.
- Users can filter tasks by assignee using the dropdown menu labeled All Users.
Tip
The task status can be changed by clicking the checkbox next to the task.
This Kanban system enables efficient collaboration and task prioritization for incident resolution. It provides a visual representation of task progress, ensuring all team members are aligned on the current workload and priorities.
Incident view
View and manage tasks grouped by their associated incidents to track progress across multiple response efforts.
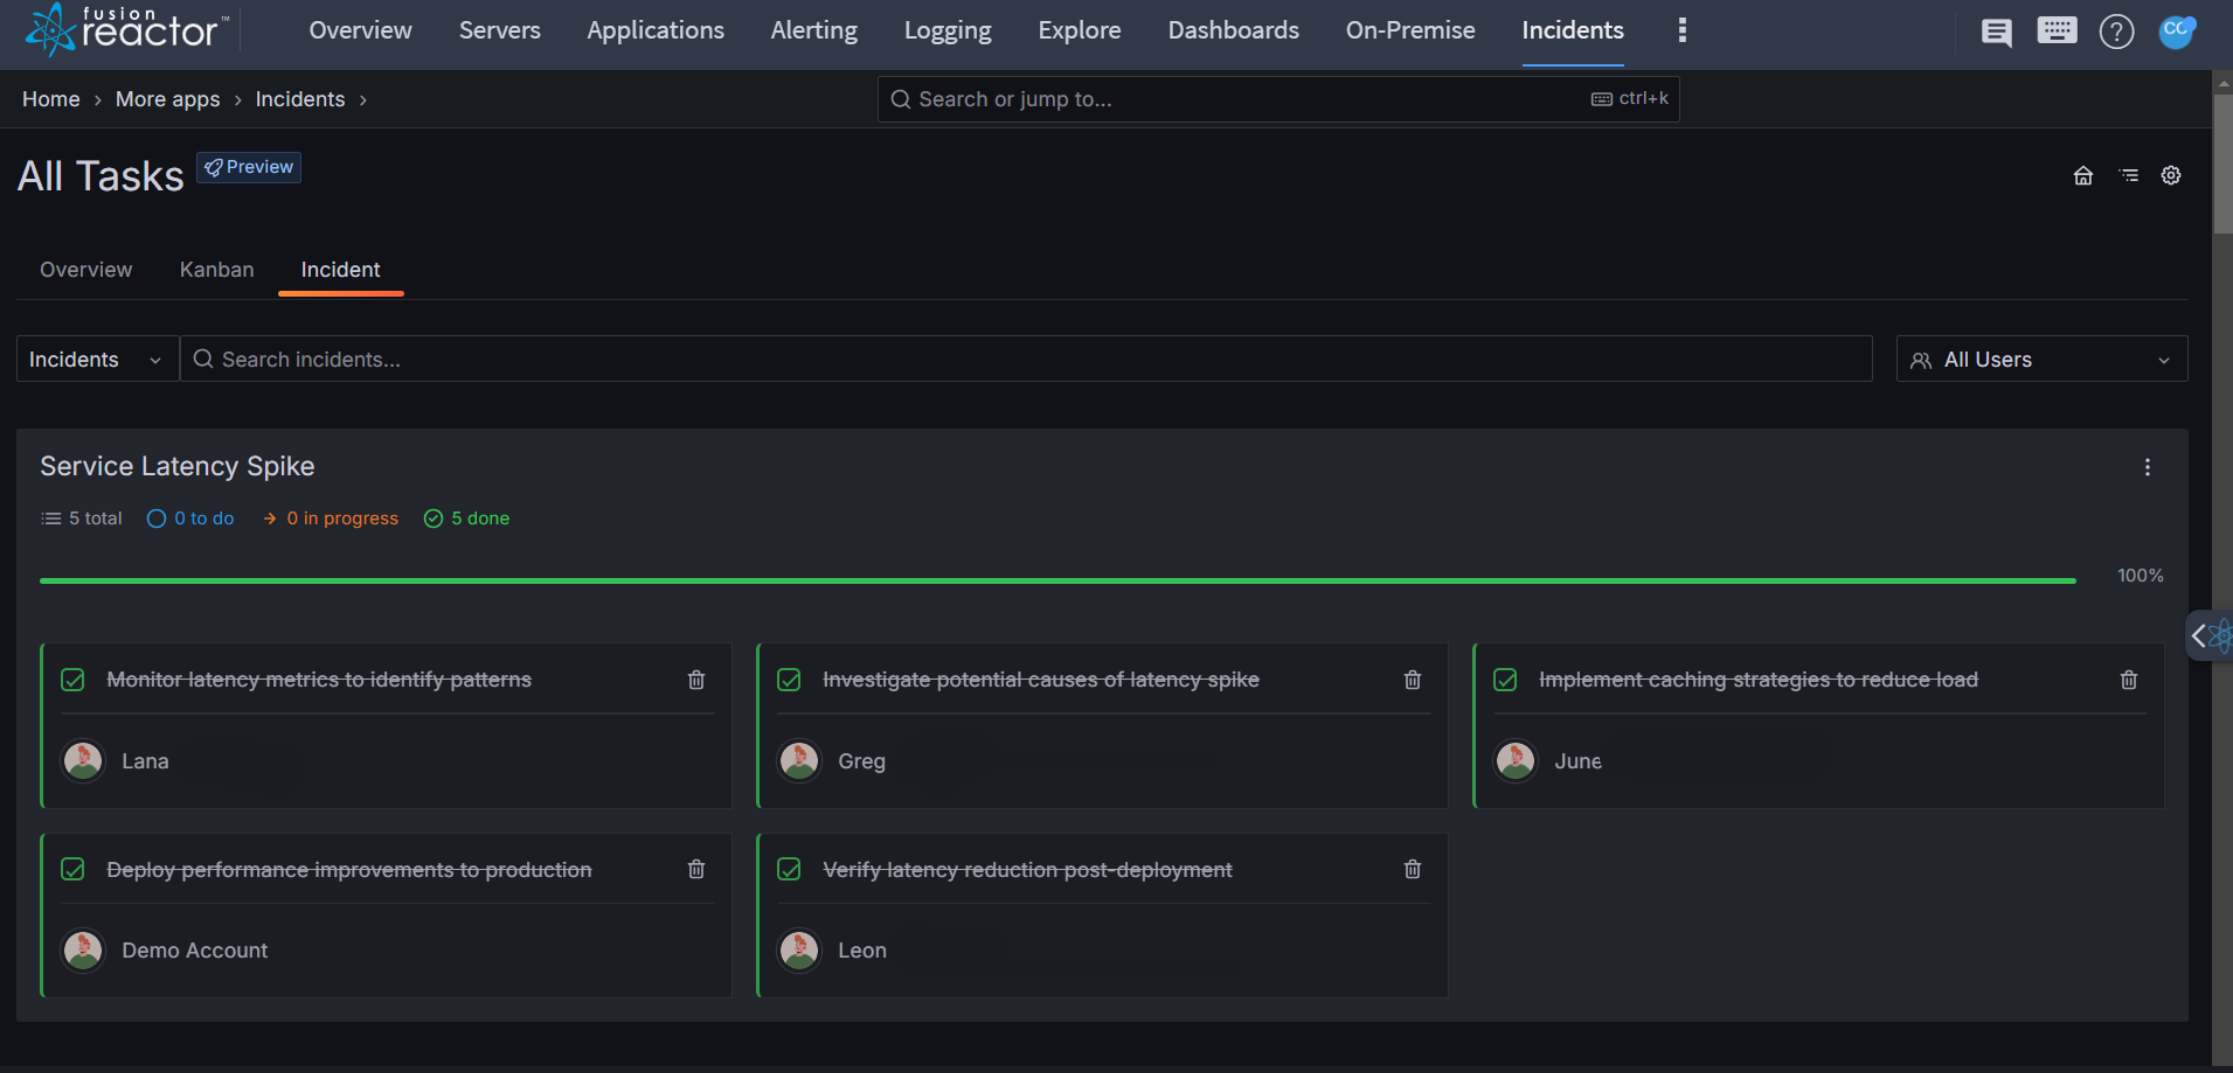
Each incident section shows:
- Incident name (e.g., "Service Latency Spike")
- Progress summary showing total tasks and their status (todo, in progress, done)
- Visual progress bar indicating overall completion
- Task cards displaying:
- Task description
- Assigned team member with avatar
- Task status indicator
- Quick-access delete button
Key Features
- Filter tasks by incident using the dropdown menu
- Filter by team member using the All Users selector
- Search across all incident tasks using the search bar
- View completed tasks with strikethrough formatting
- Access additional options via the menu (⋮) button:
- Go to incident
- Add task
User assignments
Strengthen your incident response by instantly bringing in the right experts and stakeholders using the Add a user feature. Whether you need hands-on responders or observers keeping track of progress, you can seamlessly expand your incident team with just a few clicks. Team members join with appropriate permissions, allowing them to immediately contribute to incident resolution or maintain situational awareness.
- Assign users to tasks or roles directly from the incident view.
- Track user involvement with activity logs.
Tips & best practices
Incident creation
- Use clear, descriptive titles.- Assign severity levels thoughtfully.
- Add relevant labels for easy categorization.
- Provide comprehensive descriptions to minimize follow-ups.
Task management
- Break down complex incidents into smaller, manageable tasks.- Assign tasks promptly to ensure accountability.
- Regularly update task statuses to maintain visibility.
Activity logging
- Document all significant actions and decisions.- Use rich text formatting for clarity.
- Include links or references to related resources.
Label usage
- Apply consistent naming conventions for labels.- Regularly review and update labels to reflect current needs.
Status updates
- Keep incident statuses current.- Use comments to explain status changes when needed.
Drills
- Ensure every drill has a goal, such as testing a specific process or response time.- Clearly define participant roles to simulate real incident conditions.
- Base drills on past incidents or potential threats to improve preparedness.
- After completion, analyze the drill’s performance and document lessons learned.
Troubleshooting
Address common incident management challenges with these quick solutions.
| Issue | Resolution |
|---|---|
| Cannot Create Incident | Ensure all required fields are filled, valid severity selected. |
| Task Updates Not Saving | Refresh the page or check your connection. |
| Labels Not Appearing | Refresh the label list or check permissions. |
| Status Changes Not Working | Verify permissions and valid status transitions. |
Need more help?
Contact support in the chat bubble and let us know how we can assist.