Enterprise scripting example
This section will guide you step-by-step through the configuration process of the Enterprise scripts feature of FusionReactor.
FusionReactor Enterprise scripting, enhances FusionReactor's Enterprise monitoring to trigger configurable scripts when a server's responsiveness status changes.
Note
The Enterprise Scripting feature is only available with an Enterprise/Ultimate license.
Getting started
In order to start using the Enterprise scripting feature of FusionReactor, first, you need to locate the example scripts provided by FusionReactor.
The example scripts can be found in the following directory: {FusionReactor Installation Directory}/etc/cp. Inside this directory you are going to find two folders, Windows / Unix, and depending on the OS that you are using you can navigate to inside the folders and choose the script that is best for your environment.
!! note Before you apply any changes in the scripts, it's advisable to have a copy of those in another directory. The benefit of that is to always have a pristine copy available for new scripts.
Enterprise scripting with ColdFusion 2016 on Windows
Below is a working example with a ColdFusion 2016 server Windows with the use of FRAM.
Step 1: Install FusionReactor
In this step we will assume that you have already installed FusionReactor in your environment and with the use of the automated installer. If you haven't downloaded FusionReactor yet, please follow the link in order to get a copy, Download FusionReactor.
Learn more
Step 2: Access FRAM via the browser & install FusionReactor instance
Access FRAM
When the installation process has been successfully completed, access FRAM via your browser by typing localhost:8087, where 8087 is the default port for FRAM. In case you have used another port, then access FRAM by typing the configures port.
Install FusionReactor instance
Navigate to the Instance Manager tab and then use the Scan System feature to search for an application server.
Example
A ColdFusion 2016 application server is already installed in the following directory: C:\applicationservers\coldfusion\2016. Add that directory in the Root Scan Directory field press the Scan System button.

When the application server, for the above example Coldfusion 2016, is going to appear, press the add button :fa-plus: , and install a FusionReactor instance by following the Configuration Dialog.
If the process has been successful, the following is displayed:

Learn more
Step 3: Script preparation
Follow the steps listed below in order to prepare the script that you are going to use.
- Navigate to the directory: {FusionReactor Installation Directory}/etc/cp
- Access the windows folder.
- Locate the Restart-Coldfusion9-OnWindows batch file.
- Make a copy of that file in another directory.
- Open the batch file with any text editor.
That script was specifically created for a ColdFusion 9 application server, however, we are going to make a couple of small changes in order to use the script with a ColdFusion 2016 application server.
Note
The process and the steps described in that section can be used with a ColdFusion 10,11 application server.
- Firstly, you might want to change the location of the
output of the script. For this example, I have set the location of
the log file to be: C:\FusionReactor\etc\cp.

- Secondly, you might want to change the username
and the password. In case FRAM and the ColdFusion 2016
application server are running under a Local System account,
then no changes need to be made. However, in case you are using
another user, then you need to define the username and the password
of that user in the script. This action is necessary because the
script needs to have specific permissions in order to execute any
commands in the script. In order to identify the user, access
the Windows Services, locate the FusionReactor AM Service
or the ColdFusion 2016 Application server, right click >
Properties > Log On.

-
As we previously said, the script has been created for a ColdFusion 9 application server, so the last change will be in the Command to execute part of the script. There we need to change the value set COMMAND=sc \\%HOST% start ColdFusion 9 Application Server to set COMMAND=sc \\%HOST% start ColdFusion 2016 Application Server.

These were the main changes made in the script, please make sure that you SAVE any changes made before you apply the script.
Step 4: Adding the script to Manage Servers
The final step, is to add the script to the monitored server's configuration. To do that, follow the steps described below:
-
Access the FRAM instance via your Browser.
-
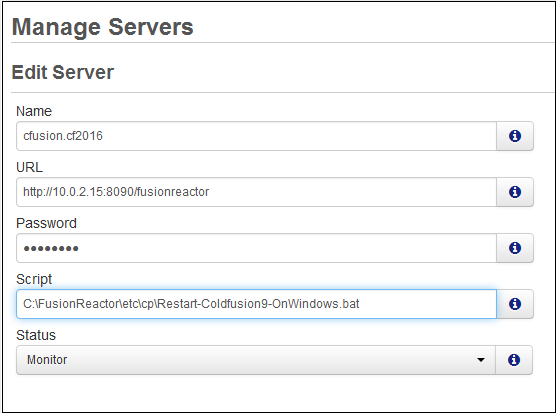
Press the Globe icon and navigate to the Manage Servers tab.

-
Locate the ColdFusion 2016 application server and press Edit.

-
In the Script field add the directory of the script.
Example
C:\FusionReactor\etc\cp\Restart-Coldfusion9-OnWindows.bat
-
Save the new configuration.
Testing the script
The script can be tested by simply using the Windows Service Control panel to STOP the monitored ColdFusion 2016 service and observing the script log file,C:\FusionReactor\etc\cp, which shows the output of the script. If the execution of the script has been successful, then the ColdFusion 2016 application server will start after a couple of seconds.
Conclusion
We've shown you how to configure Enterprise scripting to restart a ColdFusion server. The scope for what scripts can do is immense, since there are no restrictions on what they call. It would be a simple task, for example, to integrate FusionReactor into an SNMP monitoring solution, write custom log messages or send SMS text messages.
Need more help?
Contact support in the chat bubble and let us know how we can assist.